Mailchimp postcards let you reach more people and stand out from the crowd. This article will explain to you all you need to know about Mailchimp postcards. Let’s get started, Mailchimp takes care of the more complex design tasks, so you can focus on making your cards look great.
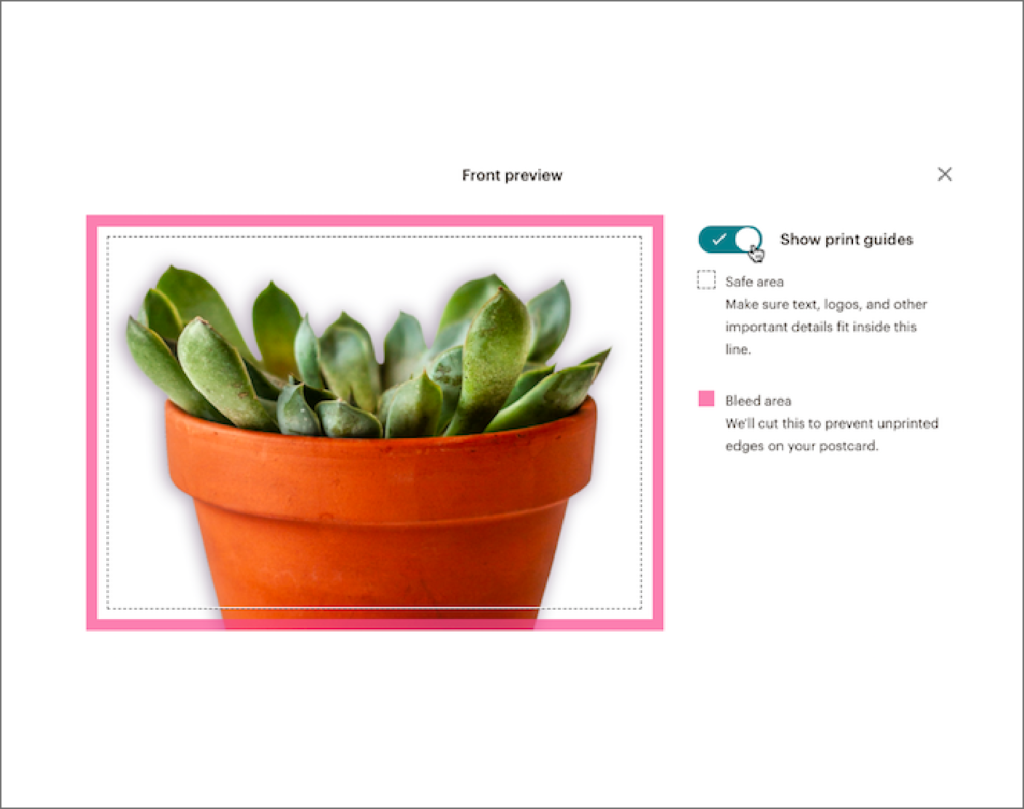
They will show you where your cards will be cropped (the bleed area) for your Photos, to ensure that important details are not cut off.
Mailchimp will automatically convert your image to CMYK (the colour model used in printing), so it will remain vibrant when mailed to your contacts. To receive a Free test postcard click here.
To make sure your designs are correct, you need to consider the following requirements:
- Postcard size: 4.25 x 6 inches
- Image size: 1875 x 1350 pixels or more
- File type: JPEG or PNG
- The brightness of the computer monitor (also very dark to prevent viewing Digital image) when printing): 70% or less.
What can you use Mailchimp postcards for
Stand out with Mailchimp postcards and reach more people using their amazing lookalike audience finder. Choose a segment of your existing contacts, like your VIPs, repeat customers, or contacts with a specific tag, and a location you’d like to focus your budget on. Then, Mailchimp will find people who are most likely to engage with your brand, download your app, or buy your stuff.
Don’t have mailing addresses? Mailchimp can help with that!
Send postcards to your existing contacts, even if you only have their email addresses. Mailchimp’s address finder matches mailing addresses to your contacts, so you can talk to them from inbox to mailbox.
Here are some ideas on how to use Mailchimp postcards:
- Make an announcement. Let your customers know about your grand opening or an upcoming event.
- Reward loyal customers. Send promo codes to loyal customers to keep them coming back for more.
- Recover abandoned carts. Remind your shoppers about their abandoned carts with a postcard pared with an email.
- Say hello or thank you. Or both! Delight your audience with a greeting or thank you they can hang on the fridge.
Define your goals
Before you start making your postcards, you need to answer the following 3 questions:
- Who is your audience?
- Why are you sending it?
- How will you get people to read it?
Mailchimp has everything you need to contact the right people with beautiful postcards. Now that you have set your goals, we can continue to design postcards.
Create your layout
Create your design in just a few clicks to create postcards in Mailchimp.
Focus on what’s important. If the purpose of your postcard is to get people to buy a specific product or use your service, consider using an image that highlights your main subject. Are you using a stock photo and planning on taking it yourself? Adjust the camera’s depth of field, or hold your smartphone steady for clear close-ups.
Leave space between objects. Blank space, also called negative space, is an area of a design that isn’t taken up by text, photos or other elements. By leaving a little space in your design, you can draw people to what they need to know.
Use a neutral background. A busy background can make text and design elements difficult to distinguish. People will decide at a glance whether they are interested in learning more about you, so don’t make them work hard to find what you offer.
Be thoughtful about where you place your copy. If you’re adding a headline or any other copy on the front of your postcard, make it easier to read by grouping together different types of copy. For example, choose one area for your logo, contact details, and website URL, while your headline or special offer go in a separate area.
Choose pictures that stand out in each inbox.
Every successful postcard is centred around a beautiful photo. Mailchimp postcards are 4.25″x 6″ in size and are printed on glossy UV-coated digital paper, making it easy to get straight to the point with your marketing message and design. Your images must be larger than 1875 x 1350 pixels so that they don’t look pixelated when Mailchimp prints them, and you’ll be able to see if any images you already have stored in Mailchimp’s content manager are the right size to work with your postcards.
Keep the focus on your subject
Mailchimp suggests choosing an image that features 1 thing you want people to buy or do. So instead of promoting 5 different products you sell, talk about 1 specific item.
Note: Like Facebook ads, lifestyle images that show someone using your product tend to get the best results.
Zooming in on your product also gives your customers a detailed view to help them make up their mind about buying.
How to write compelling copy
The secret to writing copy that will keep your postcard out of the junk pile is getting these key things right:
- An irresistible offer
- An informative and exciting headline
- A clear call-to-action (CTA)
But you’ll also want to consider how your copy and graphics will work together. Does your copy make sense when paired with your graphics? Is it clear what your customers should do next?
Make it easier for people to see your message
Whether to add text on the front of the postcard is entirely up to you, because there is space on the back to convey your message. But including the copy on both the front and back can help you tell a more complete story.
When adding text to your graphic design, keep the following in mind:
- Put your main offer and most important details on the front
- Use as few words as possible, and try not to crowd any white space
- Make sure your text isn’t on top of or covering your image
Mailchimp’s built-in photo editor can add text to images quickly and easily. You can even crop and resize, adjust layers, and add filters like a professional.
On the back, you can post more detailed information about sales, products, or any other information you want to convey. This is a good place to mention the benefits of your product, and can even reinforce important information you have added on the front, such as your CTA.
Make sure to keep a copy on the back of the message:
- easy to read,
- clear and concise,
- on-brand.
Make sure you’re ready to send your Mailchimp postcard
In addition to reading your copy for errors and checking whether your image meets your standards, you should also use Mailchimp’s postcard preview tool to understand how your postcard will look when it is shipped. Mailchimp will show you where the printer will trim your postcard, so you can make sure the key elements of your design won’t be given the chop.
To book an appointment with White Rabit to discuss how we can help you get your Mailchimp Postcard campaigns up and running click here.